Chapter III - Tonal effects in machine stitchery
This part of the module has taken me many weeks :( I started the new chapters with enthusiasm, but not long after, my trusty 27 year old Elna bit the dust and stopped play. But, on the positive side, I bought a shiny new computerised Brother (sorry David!) that even threads its own needle! A big bonus when your eyesight is starting to dim a little like mine!
I've been learning the ins and outs of the machine - had a few stumbling blocks (see notes further on!), but in general I am well pleased with its capabilities.
The samples
The following stitched samples are 10 x10cm utilizing black thread and various stitches in different lengths and widths, as well as differing distances between the rows to create tonal change.
NB You can click any image to view in the Blogger image viewer from which you should be able to right click (pc) or control click (mac) again to view an enlarged version.
Machined Whipstitch
The bobbin with screwdriver at the ready
Top
Reverse of the fabric
Above is another Whipstitch sample together with one in Cable Stitch, which is created with thicker threads/yarns hand wound onto the bobbin with the bottom tension adjusted.
As you can see it took me many attempts to get the tension right!
And this excerpt from my notebook shows a little of my frustration with the process!
Sewn with Perle thread.
The final page shows a group of cablestitched samples with thicker threads and yarn.
When you get it right it's a lovely effect!
Machine Stitched Bands
For the following section of work I have looked at my previously machined samples and considered how to utilize some of these methods to create animal-like markings. I cut strips of fabric 4 x 30 cms and stitched these with various threads, varying stitch length and width and creating density of tone in some areas by overlapping the stitchery. Decorative stitching like this will be used with decorated fabrics later in the final chapters of the module in the creation of a functional, 3-dimensional item.
Created with adjusted stitch length and width
Adjusted stitch length, width and overlapping.
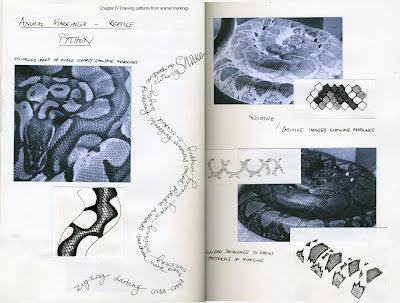
Chapter IV - Drawing Patterns from Animal Markings
I had collected images of animals for the montage I made as part of the preliminary work in this module. For this chapter I enlarged and made some negative versions of the images to enable me to see the markings more clearly. I then focused on specific areas and created patterns with linear and tonal drawings. I also wrote a list of descriptive words to accompany each animal.
That's all for now. I'm off to create some patterned paper and fabrics!


Oh WOW, that's so cool! It's like drawing with pen and ink, but in thread instead! That is incredible. Love your journal pages, particularly the fish and the writing on the snake entry. One of these days, you'll be showing us an entire illustration done in thread.
ReplyDeleteDon't you juts love those pincushions??? Hope you are having a great weekend!
Thanks Bella! Am delighted that you've visited! Yes, that pincushion.. must have had it for over 30 years!
ReplyDeleteHi Caroline,
ReplyDeleteIt was so good to hear from a new Distant Stitch friend. Your work is amazing and so organised! Your stitched columns are superb. I look forward to following your blog. I'm kind of stuck on Chapter 6 right now, tie dye and shibori. Preparing the fabric for dyeing is taking longer than I anticipated. I envy you your new all singing all dancing machine. I'm sure the teething troubles will be worth it.
Hi Catherine - thanks for visiting! Good luck with the dyeing - I've already been out to buy a length of pipe from the local builders' supplies - they must have thought I was crazy! Yes, the machine needed a bit of coaxing but I got there! Hope Chapter 6 is a success - will look forward to seeing what you produce.
ReplyDeleteHow lovely to make contact!
ReplyDeletei've hada peep at your blog and really loved the work. i'm working on the machine stitched samples at the moment. Lets keep in touch as we work. i'm a bit slow due to my job commitments but dedicated none the less.
My e-mail is on Sian's list if we need a longer chat
Carrie
Hi Caroline
ReplyDeleteI had great problems with the cable stitch too - eventually found that slowing ther speed down worked - also getting a proper black in the dyeing - good luck!
Your work looks great